Pages

Thursday, October 29, 2015

Minecraft: Forge

Minecraft Forge is a basically a mod development kit and framework for Minecraft.

If you are a user, and not a mod developer, all you need to know is how to install the right Forge for your Minecraft version, and how to install mods once you have Forge. Okay, and I'll go over how to download the Forge version as well.

Recent versions of Forge have a very, very nice java installer. First, go to the download page at the Forge site, http://files.minecraftforge.net. Wow, they have just changed this page around significantly. Looks like you scroll down to where the Minecraft versions are listed, then select your version, then the page reloads, then you can click the Installer-Win icon for Recommended or Latest. I recommend Recommended.

On the next page, don't be fooled by the stuff on the page, just click Skip in the upper right corner.

This should start the download however that works for your browser. You should save the file, then open it when the download is complete.

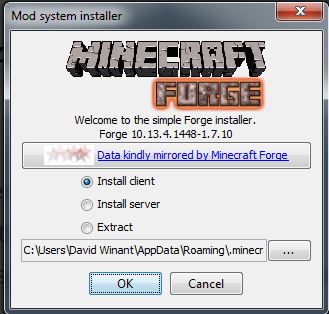
When you run the installer it will look something like this:
This is a good time to confirm that you have the right version. Leave "Install client" selected and leave the path alone and just click Ok.

After a short time it should complete:

At this point, load the launcher and create a new profile.

And now your launcher should allow you to select the new version with Forge, like so:
That's it as far as installing goes.

Before you try to add a mod, though, you'll want to startup the profile first. Make sure the profile is selected in the launcher and click Play. Then wait for Minecraft to load. When it does, you should see the confirmation that Forge is active in the lower left corner:
Now you can should exit Minecraft. This little exercise allows Forge to create the mods directory, which is where you will copy your Forge-enabled mods.

The simple way to find the directory is to go back to the launcher, Edit Profile and click the Open Game Dir button. You will see a list of directories, including the new "mods" directory. Just copy your mod's jar file there and hit Play and that's all it should take.


Wednesday, October 28, 2015

Minecraft: The Launcher


Around version 7, Mojang came out with a new launcher for Minecraft. This new launcher easily manages multiple Minecraft versions and adds "profiles" and "game directories."

Before the new launcher, all Minecraft used a single directory in the user's AppData path. This meant that as you started using the game, creating worlds, adding mods and so on, it would all go in the same directory. Then if you wanted to play a different version of the game, you would still have most of the old stuff. It got very messy.

In the new launcher, we have Profiles. Profiles simplify using Minecraft for multiple different playing environments on a single computer. For instance, if you want to run version 1.6.2 with Flan's Mod, you setup a profile for that. Then if you want to run a different version with different mods, you create a new profile.


To create a profile, click on "New Profile" in the lower left corner of the launcher.


This will bring up the profile editor page.

This looks complicated, but for now you only need to worry about here things: the profile name, the game directory, and the version selected.

The profile name can be pretty much anything you want. Most people put the minecraft version or the name of the main mods they are using or something like that.

Above all, you need to check the "Game Directory" checkbox. This tells the launcher that you want to use a directory that is specific to this profile, and not lump all the profiles into a single location.
Then you just fill in the directory name.  I suggest putting all your game directories into the same parent folder, for example "C:\MC", and then add the name of the profile as the subfolder.

In the "Use version" dropdown box, just pick the version of Minecraft you want to use. It's that easy. If you've installed Forge for any versions, the Forge versions will be listed separately at the bottom of the list.

Save your profile, and you are done. One warning - when you go back to the main launcher page, you may be expecting the profile you just created to be selected, but usually it isn't. So change to the newly created profile before you hit Play!